How to Calculate Throw Distance for Auditorium Projectors
Throw distance is one of the most critical factors in designing a projector setup for auditoriums. It determines how far a projector must be from the screen to achieve the desired image size while maintaining clarity, brightness, and proper alignment. Incorrect throw distance can result in distorted images, reduced brightness, or improper coverage, negatively affecting audience experience. Calculating throw distance accurately ensures that the projector, screen, and room dimensions are perfectly aligned. XTEN-AV and other AV platforms offer tools and guidelines to simplify this process for AV professionals.
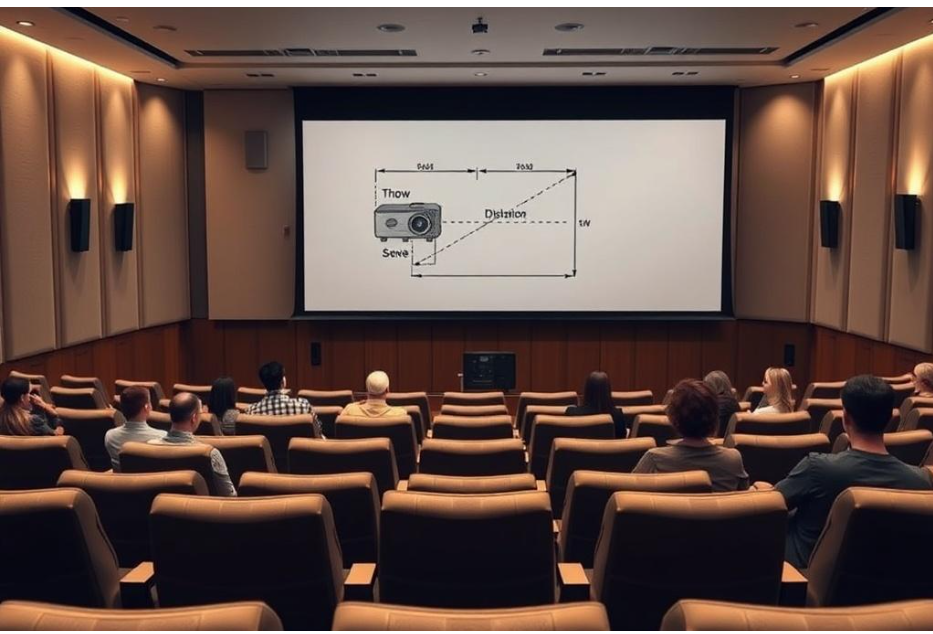
Understanding Throw Distance
Throw distance is defined as the distance between the projector lens and the projection screen. It is influenced by several factors:
-
Projector Lens Type: Short throw, standard throw, and long throw lenses have different projection capabilities.
-
Desired Image Width: The width of the projected image on the screen directly affects the required distance.
-
Aspect Ratio: The image format, typically 16:9 or 4:3, impacts both width and height calculations.
-
Screen Placement: The position of the screen within the auditorium affects alignment and viewing angles.
The Throw Ratio Formula
The throw ratio is a simple mathematical ratio used to calculate throw distance:
Throw Distance = Image Width × Throw Ratio
-
Image Width: The horizontal width of the screen in feet or meters.
-
Throw Ratio: Provided by the projector manufacturer, typically expressed as a range (for example 1.5–2.0).
This formula allows AV professionals to determine the optimal placement of the projector relative to the screen.
Step-by-Step Throw Distance Calculation
Determine Desired Screen Width
-
Measure the physical width of the screen or the size required for the auditorium.
-
Consider seating distance and room dimensions to ensure visibility for all audience members.
Identify the Projector’s Throw Ratio
-
Refer to the projector specifications for its minimum and maximum throw ratios.
-
A variable throw lens allows flexibility in positioning, while fixed lenses require precise calculations.
Calculate Minimum and Maximum Throw Distances
-
Multiply the screen width by the minimum throw ratio to find the closest the projector can be.
-
Multiply the screen width by the maximum throw ratio to find the farthest placement.
-
This range allows room for adjustments, lens shift, and minor alignment corrections.
Adjust for Screen Height and Lens Shift
-
Use vertical lens shift to align the image with the top of the screen without tilting the projector.
-
Factor in projector height to avoid obstacles, sightline interference, and glare.
Check Against Room Dimensions
-
Ensure the calculated throw distance fits within the available ceiling or rear wall space.
-
Verify that the projector does not obstruct lighting fixtures, HVAC vents, or stage equipment.
Consider Ambient Lighting
-
Higher ambient light may require shorter throw distances or higher brightness projectors to maintain image clarity.
-
Adjust throw distance calculations accordingly to ensure consistent image quality.
Using XTEN-AV Tools for Accurate Calculation
Modern AV platforms, including XTEN-AV, simplify throw distance calculations:
-
Simulation Tools: Create 3D room models to visualize projector placement relative to screens and seating.
-
Lens Database: Access real-time projector lens specifications to calculate exact throw distances.
-
Interactive Adjustments: Modify screen size, projector height, or lens options to see immediate results.
-
Error Prevention: Avoid common miscalculations that lead to image distortion or improper coverage.
Practical Examples
-
Medium-Sized School Auditorium: For a 12-foot-wide screen and a projector with a throw ratio of 1.5, the throw distance is 12 × 1.5 = 18 feet. If the projector’s range is 1.5–2.0, the distance can vary from 18 to 24 feet for flexibility in placement.
-
Large Corporate Auditorium: For a 24-foot-wide screen and a throw ratio of 2.0–3.0, the throw distance ranges from 48 to 72 feet, requiring high-lumen or laser projectors to maintain image brightness and clarity.
Lens Options and Adjustments
-
Short Throw Lenses: Ideal for compact auditoriums or low ceilings; require minimal distance from the screen.
-
Standard Lenses: Provide flexibility for medium-sized rooms with moderate ceiling heights.
-
Long Throw Lenses: Required for large auditoriums where projectors are positioned far from the screen.
-
Zoom Lenses: Allow fine adjustments of image size without moving the projector physically.
Edge Cases and Considerations
-
Rear Projection: If using rear projection, the throw distance must account for the screen thickness and available space behind the screen.
-
Multi-Projector Setups: When blending multiple projectors, throw distance calculations must ensure seamless image overlap.
-
Projection Angle: Tilted or angled projection affects throw distance slightly; lens shift or mechanical adjustments are necessary to compensate.
Testing and Calibration
-
Physical Test: After calculating throw distance, perform a physical test by projecting onto the screen to verify image coverage.
-
Fine-Tuning: Adjust zoom, focus, and lens shift to correct minor discrepancies.
-
Simulation Verification: Use XTEN-AV simulation tools to double-check calculations before final installation.
Common Mistakes in Throw Distance Calculation
-
Ignoring Lens Specifications: Using a projector without checking its throw ratio can result in an oversized or undersized image.
-
Neglecting Room Obstacles: Miscalculating distance without accounting for columns, lighting, or stage equipment.
-
Overreliance on Keystone: Excessive keystone correction can reduce image clarity instead of properly adjusting throw distance.
-
Not Considering Audience Sightlines: Ensuring all rows can see the screen clearly may require minor adjustments in placement.
Maintenance and Future Proofing
-
Adjustable Lenses: Using zoom or lens shift capabilities allows for future screen or seating changes without relocating the projector.
-
High-Lumen Projectors: Ensures sufficient brightness over time, even as projector performance gradually declines.
-
Software Updates: Firmware improvements may optimize throw distance calculation or image alignment for advanced projectors.
Case Study Example
A university auditorium required a 20-foot-wide screen for lectures and conferences. Using XTEN-AV, the AV team simulated the room layout and identified a projector with a 1.6–2.0 throw ratio. The calculated throw distance was 32 feet at minimum and 40 feet at maximum. Ceiling mounts were installed at 35 feet from the screen with lens shift adjustments to ensure perfect alignment. The AV team verified coverage from every seat and adjusted brightness and focus for uniform image quality. The result was a clear, distortion-free image visible across the entire auditorium.
Conclusion
Accurate throw distance calculation is essential for successful auditorium projector setups. It ensures proper image size, clarity, brightness, and alignment for all audience members. Factors such as screen width, throw ratio, lens type, projector height, ambient lighting, and room dimensions all influence throw distance. Using simulation tools and AV platforms like XTEN-AV helps designers visualize projector placement, prevent mistakes, and optimize the installation. By following these guidelines, AV professionals can achieve professional-quality projection in any auditorium, ensuring a seamless visual experience for presentations, performances, and events.