How Do I Design a Projector Setup That Guarantees No Blur in Home Theaters
XTEN-AV is at the forefront of AV design solutions, helping home theater enthusiasts and professionals achieve crystal-clear projector images. One of the most common issues in home theater setups is a blurry image. Keywords like why is my projector blurry, projector blurry, my projector is blurry, and how to fix blurry projector are often searched by users who want a sharp, immersive viewing experience. Designing a projector setup correctly from the start is the key to eliminating blur.
Step 1: Choose the Right Projector
Not all projectors are ideal for home theaters. Consider:
-
Resolution: Higher resolution reduces pixelation and improves sharpness.
-
Lens Quality: A quality lens ensures even focus across the entire screen.
-
Throw Ratio: Determines how far the projector needs to be from the screen to achieve the desired image size.
Selecting a projector that matches your room size and screen ensures that my projector is blurry scenarios are avoided.
Step 2: Determine Optimal Screen Size and Placement
The screen size must match the projector’s throw distance. Using tools like XTEN-AV, you can simulate your room and find the ideal screen width and height. Incorrect screen size is a common reason why images appear blurry. The screen should also be placed at a comfortable viewing height and distance for all seating positions.
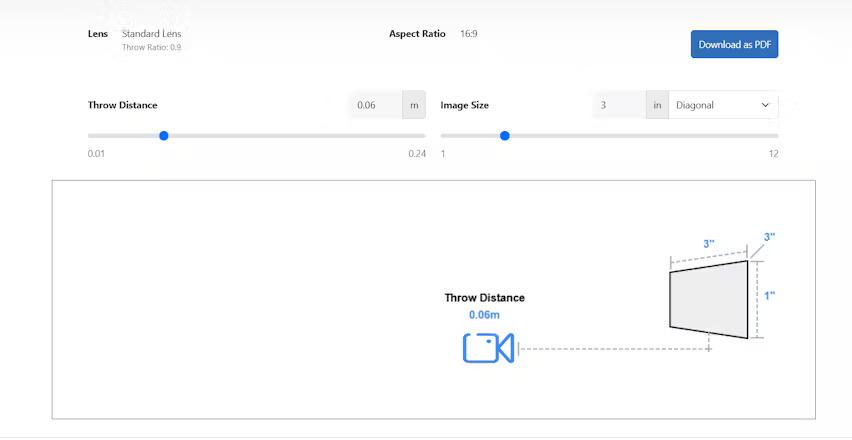
Step 3: Calculate Projector Placement
Use the throw ratio formula to determine projector distance:
Place the projector at this distance, ensuring it is level with or slightly above the center of the screen. Avoid excessive keystone correction as it can introduce blur, particularly at the corners.
Step 4: Adjust Focus and Lens Shift
Once the projector is in position, adjust the focus ring slowly until the image is sharp. Use lens shift if the projector allows it, to center the image without tilting the unit. If projector blurry issues persist, check the lens for dust or smudges.
Step 5: Optimize Lighting and Environment
Ambient light can affect perceived sharpness. Darker rooms enhance image clarity, while bright walls or windows can reduce contrast. Choosing the right screen material also impacts sharpness; high-gain screens can improve perceived focus.
Step 6: Test Content and Seating Angles
Project different types of content, including movies, presentations, and video games. Check that text and graphics remain sharp across all seating positions. If the edges appear blurry, small adjustments in tilt or zoom can correct them.
Step 7: Use AV Design Software
Software like XTEN-AV allows you to model your home theater in 3D, testing projector placement, screen size, and room layout virtually. This prevents how to fix blurry projector scenarios and ensures a perfect installation before the first cable is plugged in.
Final Thoughts
A perfectly sharp home theater projection is achievable with careful planning and the right tools. Keywords like why is my projector blurry, projector blurry, and my projector is blurry highlight common frustrations that can be avoided with proper design.
By selecting the right projector, calculating precise placement, adjusting focus and lens shift, and using AV design software for simulation, you can guarantee a home theater setup with no blur. XTEN-AV’s tools make this process easier, giving you confidence that every movie night or gaming session delivers the crisp, immersive experience you deserve.
Read more: https://avsyncstudio.wordpress.com/2025/10/13/how-to-minimize-blur-from-keystone-distortion/