How to Mount a Projector on Your Bedroom Ceiling
XTEN-AV is known for simplifying AV installations for homes and businesses alike. If you want to bring a cinematic experience into your personal space, one of the best ways is to setup a projector in your bedroom. Mounting a projector on your ceiling saves space, improves image alignment, and gives your room a sleek professional look. Whether you are creating a small entertainment corner or transforming your bedroom into a mini home theater, the right steps can make the entire process smooth and efficient.
In this guide, we will walk you through everything from choosing the right equipment to securely installing a projector in the bedroom. You will also learn how to select the right projector screen for your bedroom and ensure optimal image quality for immersive viewing.
Why Mount the Projector on the Ceiling
Mounting your projector on the ceiling offers several benefits. First, it keeps the device out of the way, making your space feel more organized. Second, it ensures that the projector is aligned with the screen, which minimizes distortion and creates a balanced viewing experience. Finally, it helps with cable management, as wires can be routed along the ceiling or through the walls for a clean finish.
For a seamless bedroom projector setup, ceiling mounting is often the most practical and visually appealing option.
Step 1. Choose the Right Projector
Before you begin installing a projector in the bedroom, it is important to select a device that suits your space. Consider the following factors.
-
Throw Distance. Check how far your projector needs to be from the screen to produce the desired image size. Bedrooms are usually smaller spaces, so a short throw or ultra short throw projector may be ideal.
-
Brightness. Bedrooms generally have lower light levels, so a projector with around 1500 to 2500 lumens is usually sufficient.
-
Resolution. For streaming movies or gaming, Full HD or 4K resolution provides sharp and clear visuals.
-
Noise Level. Choose a quiet projector to avoid distractions during late night viewing.
Selecting the right projector ensures that your bedroom setup delivers excellent performance without overwhelming the space.
Step 2. Select a Suitable Mount
A good ceiling mount is crucial for stability and adjustability. Choose a mount that is compatible with your projector’s weight and mounting pattern.
-
Fixed Mounts offer a sleek look but limited flexibility.
-
Adjustable Mounts allow you to fine tune the position and angle.
-
Extendable Mounts are ideal if you have high ceilings.
Ensure that the mount can tilt, rotate, and adjust for precise alignment with the screen. This will make the bedroom projector setup easier and more accurate.
Step 3. Find the Ideal Mounting Spot
Determine the best ceiling location based on your projector’s throw distance and the size of your screen.
-
Measure the Distance from the wall or screen to the projector position.
-
Align the Projector with the horizontal center of the screen to avoid keystone distortion.
-
Account for Ceiling Height so the projector does not hang too low.
Use a pencil to mark the spot where the mount will be installed. Accuracy here ensures that you get a perfectly aligned image later.
Step 4. Secure the Mount to the Ceiling
Using a stud finder, locate a ceiling joist for support. This ensures the projector is securely fastened.
-
Drill pilot holes where you marked the mounting location.
-
Attach the mounting bracket with screws and anchors.
-
Make sure it is level and tightly secured.
This step creates a stable base for the projector and reduces the risk of vibration or movement.
Step 5. Attach the Projector to the Mount
Once the mount is secured, attach your projector following the manufacturer’s instructions. Adjust the angle and tilt to point the lens directly at the center of the screen.
Ensure that the projector is firmly attached and that the alignment looks correct from the viewing position.
Step 6. Manage the Cables
Neat cable management is essential for both safety and aesthetics.
-
Run HDMI and power cables through the ceiling if possible.
-
Use cable raceways or wall channels to keep cords tidy and hidden.
-
Label cables for easy troubleshooting in the future.
Good cable management gives your installation a professional finish and prevents clutter in your bedroom.
Step 7. Select the Right Projector Screen for Your Bedroom
The right projector screen for your bedroom can make a significant difference in picture quality. While some people project directly onto a white wall, this often results in reduced contrast and uneven brightness. A dedicated screen enhances image clarity and color accuracy.
Consider these screen types.
-
Fixed Frame Screens. Ideal for permanent installations.
-
Retractable Screens. Perfect if you want the screen to disappear when not in use.
-
Ambient Light Rejecting Screens. Useful if your bedroom has some ambient light.
Make sure the screen size fits the room and works with the projector’s throw distance.
Step 8. Fine Tune the Image
Once everything is installed, turn on the projector and align the image with the screen. Adjust focus, zoom, and keystone correction to achieve a sharp rectangular picture.
Take your time during this step. A properly aligned image will enhance your viewing experience and make movie nights more enjoyable.
Step 9. Enjoy Your Personal Theater
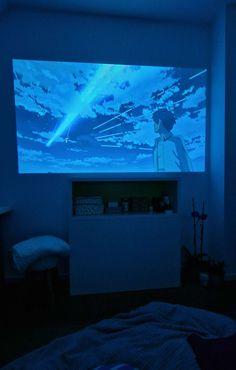
With the projector mounted and the screen installed, your bedroom can now double as a personal cinema. Whether you stream your favorite shows or watch classic films, a ceiling mounted projector delivers an immersive experience that a TV cannot match.
Additional Tips for a Perfect Setup
-
Use blackout curtains to control ambient light for better contrast.
-
Keep your projector lens clean for clear images.
-
Regularly check the mount and cables to ensure nothing has loosened over time.
-
Consider adding a soundbar or small speaker system for better audio.
Conclusion
Mounting a projector on your bedroom ceiling is an excellent way to maximize space while creating a cinematic environment. By carefully selecting your projector, choosing a sturdy mount, and managing cables neatly, you can create a setup that looks great and functions flawlessly. Choosing the right projector screen for your bedroom will take the visual quality to the next level.
XTEN-AV continues to highlight easy yet effective ways to improve home AV installations. With this step by step approach, installing a projector in the bedroom becomes a straightforward and rewarding project that transforms your space into an entertainment hub.